PART TWO: CREATING A PROCEDURAL HAIR SHADER
( A PAINTERLY APPROACH TO SHADER WRITING )
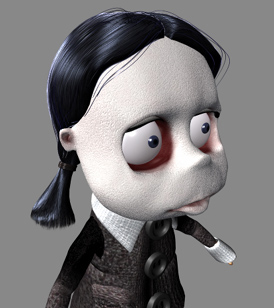
This method is a variation of the fake fur shader I used for my mouse in "Say Cheese". That original shader was designed for short hair so to make
Emelia's long hair I made a few adjustments. The basic approach was to think about what makes hair look like hair and then mimic that. When I
was using this for short hair for instance it was important to break up the edge of the geometry, so I used a noisy procedural deformation map. The process to
create Emelia's longer hair is described below, but the method is similar - you think of what makes hair look like hair and then add those elements
into the shader.
As in the previous section it is vital that the isoparameters of your nurbs model flow in the direction of your character's hair since this shader is based
on the geometry's UV coordinates. I've broken the shader up into steps so can see what's going on. For the lazy ones out there you can also
download the shader.
The main part of the shader is a 2D fractal with the UVs stretched in the direction of the hair to make the strands. In the image below you can see that
I've run the fractal into the blend channel of a blendColors node so I can determine the color of the strands. In Emelia's case the colors are black
and dark blue. In each picture you
can see progressively how each part of the shader looks on Emelia's hair as new effects are added to the shader.
1. the color channel
Next we add the specular. Below you can see I've stuck another 2D fractal into the specular channel. The difference being that the UV are stretched a lot more. In the
color fractal the UV values are 15 to 1 and in the specular fractal they are 21 to 0.2. I've tinted the color of the fractal blue using its "color gain"
channel. The main thing that makes this shader look like hair of course is that this is all happening with an anisotropic shader so the first thing you
really want to do is mess with the highlights to get them to look the way you want on your model. I used a spread value of 8.35 in X and 1.75 in Y
for Emelia's hair.
2. the anisotropic specular channel
Next we add translucency to the edges of the hair where the light shines through from behind. Like with the soft edges on the transparency channel,
this is done with a sampleInfo facing ration going through a ramp. I stuck the facing ratio attribute of a sample info node into the UV channel of a ramp
(this is a basic way to isolate the edge of an object relative to the camera which comes in handy a lot) and plugged that into the translucency making the hair
translucent around the edges. It's not pictured here but I did the same facing ratio thingy connected to the transparency to soften the hard edge of the
geometry on her hair as well (i.e. instead of having a typical hard edge to the geometry, it is soft around the edges like hair looks from a distance).
3. the translucency channel
As a final touch I made paint effects hair as described in part one of the tutorial, but with the "tubes per step" set much lower to get those scraggily loose
hairs that are not perfectly in place and thus gives the hair cut a more natural unkempt look instead of a hair sprayed "hair helmet". The devil is in the
details (or was that God?).
Emelia's finished hair
(c) 2004, All Rights Reserved. "Make Links not Copies"